

If you had renovations done or if pieces of tile were damaged during remodelling, you may have tile remnants. They’re not being used. They sit there. Think again! It’s possible to turn leftover tiles into a table using the same materials as the tile table.
So, these are some ideas for mosaic tile designs for garden tables. I also have tips for grouting and ceiling tiles. It doesn’t matter if your old table isn’t in use anymore. You can turn it into a mosaic. It is fun and easy to put together.
What you’ll require?
- Table
- Tiles in many colors
- Tile adhesive
- Grouting
- Ceiling tiles
- Hammer
- Brush
- Sponges/clothes
- Paint
- Spirit level
Prepare the table:
Paint the table’s legs with the colour you prefer, and cover any surfaces that aren’t covered with mosaic. Then, let the table dry completely. So, make sure the tabletop is clean and dry thoroughly.
Buy from an online floor tile store:
Here are a few locations you can find tiles and where to buy them.
An online floor tile store in USA always has a huge selection of tiles. In addition, some shops have some leftover tiles. These tiles are usually left in a storage box and can be purchased individually or at a discounted price.- Displays:
Some shops sell samples at a steeply discounted price or give them away.
- Friends and family:
Find out if there are any tile remnants in your garage or attic.
- Garage sales :
This is a great place to find tiles for a low price.
Size of tiles:
Be sure to get all tiles of the same height. This is so that the finished table has a level surface. So, there may be many different designs and colors.
So, you decide to determine how large or small the tiles will be used for the mosaic. I recommend that you use a mixture of sizes for your first mosaic project.
To break tiles, you can use a fork and hammer. They will break down if you tap them lightly. As you use pressure, your body will adjust to what it needs. Keep the same-colored tile pieces in separate boxes. It will make it simpler to lay them out when you design. So, if you don’t have enough boxes, it is possible to put them in separate categories.
Design your tabletop:
Once the tiles have been cut up, you can place some on the table to make your design. You can use the same colors together or combine them in rows. Use tiles of the same color to make a shape, or create straight lines. So, this table is yours to decide how to place everything.
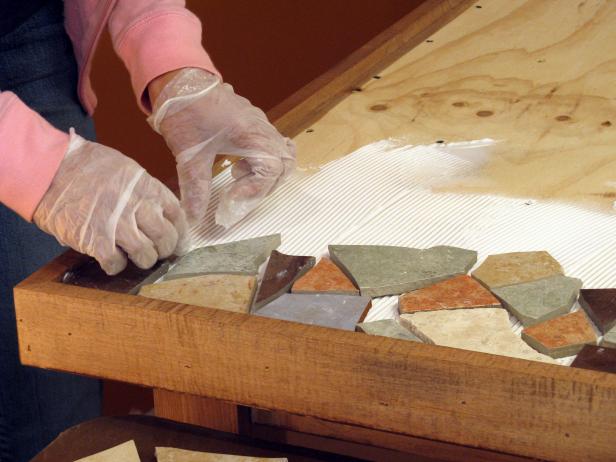
Glue the tiles:
Once you are satisfied that the design is perfect, you can glue it to the tabletop using your tile adhesive. You can cover the entire table with glue, and then you can press the tiles down. So, this can take patience. But please be careful and even.
So, place the spirit over a group of tiles that have been placed at intervals onto the table to ensure they are level. Now, let the air dry for a minimum of 24 hours.
Get queen beige polished marble at affordable prices here!
Mix the grout with water:
- Use a rubber scraper or brush for grouting the tabletop.
- To avoid grout drying out before it can spread properly, cover only a few tiles at a time.
- Smoothen grouting. As smooth as possible
- Continue going around the remaining tiles till your tabletop looks complete.
- So, clean the tiles by starting at the place you have added grout.
- You can wipe down tiles using a damp cloth or sponge.
- Use the plastic spatula to get rid of excess water, grouting, and most of it.
- This is true for all tiles.
- So, clean the entire table with a damp towel or baby wash and give it a final wipe. Polish the whole table.
Finalize the grouting:
- After the grouting has dried for 24hrs, you should inspect the table.
- To make sure that tiles are level, use the spirit measure. There will be certain areas where the spacing between tiles is uneven.
- Mix another batch of grouting, but make sure it is thinner.
- Spread the grout all over again, making sure to pay attention to any uneven areas.
- So, do the same as before and let the tiles dry for at least 24 hours.
- Add the sealer to the tiles.
Seal the floor tile:
- Mix the grout sealer as per the instructions on the bottle. My mixture was five parts water, one part sealer.
- Use a brush to apply the sealer to the mosaic. It is very wet so don’t leave any puddles.
- Leave to dry for 3 hours
- Finally, you may also apply another coat.
Do you want more ideas?
Get more inspiration from my experience! These designs used small square tiles. I already had some, so i also bought these composite tiles. So, I found them easy to use with a variety of colors.
You can keep exploring mosaic art!
Once you’ve created your first mosaic tabletops. So, you now have the skills and knowledge to make many more.
A mosaic design and fresh paint can transform an old sideboard/drawer into beautiful modern furniture pieces. So, create a mosaic for a garden wall or yard wall to bring life and color to it. Give your home a vintage vibe by decorating old mirrors or frames.
Also read: Different Styles of Bathroom Vanities in Maryland
Conclusion:
The tiling does not need to be complicated. Let me show you how to tile a top for a table or other furniture. First, shop online floor tile store to determine the general color scheme. You can use between three and four colors. Next, wrap one tile at a time with a cloth. Use tile adhesive for each piece. So, as you fill in the design, break tiles and add other details. Fill in the gaps with grout or a grout flopper. Finally, apply a wipe-able sealant to finalize the mosaic.


