

This tutorial will provide instructions on how to back up Nandroid backup to a TWRP-enabled device. The Android ecosystem offers many choices. Due to its open-source nature, the possibilities are endless. By default, every manufacturer ships a device with a locked bootloader to prevent users from changing the device’s operating system.
However, there are plenty of tech enthusiasts out there who are taking a step forward and exploring unreached areas. All you need is an unlocked bootloader. You can then install different types of custom ROMs, flash custom recoveries like TWRP, root your device via Magisk, or try multiple modules or frames.
But every country has two coins. The same is true for the optimizations mentioned above. Changing the device system partition and root directory directly is always a risk. Just one small mistake and you could end up in a load cycle or worse, a brick mover. In a normal scenario, you can easily use the backup and restore options that came with your device. However, if your device doesn’t even start up, all these features won’t work.
What else can you do? Now, there is a fairly simple way to deal with such a case. You can easily create a full device backup right after TWRP recovery, including data, boot, and even the EFS partition (which contains your IMEI). Let’s review the appropriate steps.
The backup made by TWRP is called Nandroid Backup. The best thing about this backup is the fact that you can still access this backup and restore feature even if your device doesn’t start up from the system. If you wish to do the same, several prerequisites must be met.
First of all, your device must have an unlocked bootloader. A working TWRP recovery should also be installed on your device. Also, make sure there is enough free space on your device. With that in mind, here are the necessary instructions on how to backup Nandroid using TWRP Recovery.
How to Backup Nandroid by Restoring TWRP
- First, start your device with TWRP Recovery. Use hardware keyboard shortcuts for your device or the following ADB commands. For the latter, open a Command Prompt window in the platform Tools folder (part of the Android SDK and Platform Tools). Then connect your device to the computer via USB (with USB debugging enabled) and enter the following command:
adb reboot recovery
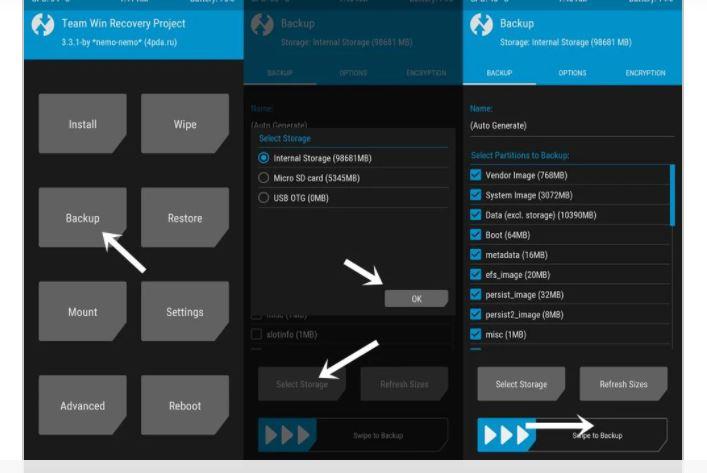
- In TWRP Recovery, click on the Backup option.
- Then select the partition to back up. It is highly recommended to select all available partitions. Although the data shared will be very high, it will contain data from all systems and pre-installed applications. Therefore, it is advisable to choose this as well.
- You can also change the backup location. Internal storage is selected by default. To change it, tap Select Storage and select Micro SD Card or USB OTG (if supported).
- If you want, you can also rename the file to be created. Just tap on the Auto-generate keyword just below the Name field and enter the name you want.
- So with all the partitions selected, swipe right using the Swipe to backup button at the bottom. Now you will have to wait a long time, depending on the size of the partition. The backup process may take some time (especially since the data partition takes a long time).
- After you finish, the message <Backup completed in x seconds> appears. You can then restart your device on the system

So, these are all the necessary steps to create a Nandroid backup by restoring TWRP. It is highly recommended that you make a backup copy of this on an SD card or with a pen (if you have a USB OTG cable). This is because the internal storage, and therefore, its backup, can be very difficult to access when your device is in a startup cycle or is looped.
Conclusion
With the above Guide, you have learned how to successfully create and recover a Nandroid archive created with TWRP Recovery. Once you have unlocked the device and installed TWRP, creating a Nandroid backup should be at the top of your bucket list. Whenever you are in a charge cycle or a device with a broker, You can use Nandroid back up and get your device working again!


